The concept of Specialist 3D was to pick a design and development project to develop over the space of 12 weeks to build important, fundamental skills, formulate ideas, test out concepts and overall to aim to create an end product to justify at least 60 hours of work. As the project grade is based 70% on a final report and only 30% on the physical project itself, it should greatly improve any and all report writing skills. On top of this, the project did not have to be a success. A failure is still viable if explain and justified.
For this project, i wanted to use my time to develop high/ low poly modelling techniques, increase my uv'ing speed and to create an effective texturing pipeline to remove the clutter and slowdown within any large scale texture map.
Project Proposal and Initial Ideas
For my independent project, i will be looking at
a wide variety of modelling and texturing techniques. Covering everything from
high polly vehicle modelling, character modelling, creating a believable,
natural looking environment and the use of lighting and colour within Unreal 4
to bring both emotion and a sense motion to a static, wartime scene.
This scene will take the form of a world war 2
trench, focusing mainly on a beaten down, disabled tank. In-front of the
vehicle; a fierce looking canister spewing mustard gas will be displayed
menacingly. With the toxic mist engulfing the base of the tank and pouring
inwards, towards to an open trench; the head of a tearful man will be visible,
pressing a battered gas mask against his face.
With the main body and turret of the tank visibly
damaged and inoperable, the upper torso and panicked, yet highly focused face
of a second mask less solider will be seen from within the tank's turret,
grasping on to a functional mounted machine-gun, covering the retreat of his comrades.
With the hopeful addition of a wisp of smoke from the weapon's barrel and a
scattered pile of shell casings, it should simulate continuous fire. The final
touch taking the form of emergency flares, lay across the ground, illuminating
the scene with a violent red.
I will be doing this scene to provide myself with
a variety of challenges within each key aspect of level design and to create a
portfolio piece that can be used to show a wide variety of skills as well as
functioning is a point of reference when improving future work/ projects.
Although it may not be a new concept, it will provide me with priceless
knowledge that can be applied to second term and third year study, motivating
me greatly. I will be making a point to showcase the damage and destruction
through the texture work, adding extra grit in regards to the emotion dictated
within each area.
The success of the project will be based on the
quality of the end products when combined within the scene. Although i could
call it a partial success if a large enough increase of skill within each area
has been reached, i would at least like each aspect to be on par in terms of
quality. With the time restraints, it should be more than possible although
fancy lighting and mist/ smoke effects within the game engine "Unreal
4" may have to be left behind if they become too awkward or time
consuming. Even in this case, i would like to still showcase the scene as a
whole and the assets, layed out one-by-one to a selection of first, second and
third year students and ask for their opinions on each aspect from modelling,
texture work and style. Ending on a simple question of "if they were in
industry, would they allow the assets through quality assurance".
I would like the test the emotional reaction that
can be achieved by showcasing the horrors of war and bravery/ selfless nature
found within those serving on the front line. Although there are no ethical
issues with the project, it may be seen as quite distasteful by anyone of
German origin due to the heavily implied Nazi threat.
With the increasing popularity of software
packages such as NDU which greatly increases the speed of texturing, generating
a variety of fully functional maps on its own, i feel that combining hard
surface texturing techniques alongside hand painted methods will be essential
so i am not left too reliant on its automated methods in the future and can
understand the effects of wear and tear on a wide variety of materials and
surfaces.
Knowledge wise, i have a decent understanding of
texturing, both high and low polly modelling and the techniques used within but
i have a variety of tutorials available that will be watched over the 12 weeks
to further increase my knowledge and enthusiasm. I'm anticipating the tank to
be fairly time consuming yet not too difficult but the partial character
modelling could take anywhere from a few nights to upwards of a week to get up
to par.
I have collected a wide assortment of reference
photos and blueprints for American tanks, trenches and wartime scenes that i should be able to use as a basis for
the modelling and texturing. I have attempted to find 3d artists that have
depicted both fear and bravery within a hopeless, wartime environment but have
been unable to find anything substantial. To ensure that my time is used
effectively, i will be modelling the high polly version of the tank whilst
looking further for artist reference. As the tank will be built directly from
blueprints, there's very little to no chance of the model requiring any changes
after solid research has been completed.
--------------------------
Before moving forwards with the modelling process, a lot of extra research took place, mainly in to the look and feel of military vehicles and attire within world war 2 on the soviet, German, British and American fronts to see what side offered the most creative freedom within their designs.
Starting with the German military, i found that they opted for very body and bare-bone designs for almost all of their vehicles and very rarely included outside details. On top of this, due to their very grey colour scheme, very little to no detail could be found on their vehicles. Take the Tiger tank for example as shown below. The entire tank consists of a simple box for the main body and a second box for the turret. A fair bit of detail can be seen in the barrel and tracks but these would not really be seen as focus points, making it a fairly un-interesting task to model with very few options for skill building atleast within the modelling stages.

Soviet tanks were the next on the research list and for the most part seemed very rounded in nature, adding some interesting geometry but as with the German tank line, very few extra details are seen across the turret and main body leading me to believe that they went for a very minimalistic design path. Although the rounded shapes and angled armour would help develop my modelling skills, the sever lack of clutter would make the project too small and uninteresting. Take the Is-2 heavy tank for example.

British tanks were the next line to cover but had the entire opposite problem to the soviet and German designs in the fact that they contained far too much detail which would make the entire project far too overwhelming. I understand that the project doesn't need to succeed but i do want to leave specialist 3D with at least one portfolio ready piece. The Churchill tank for example contained hugely detailed, curved and straight pieces of armour plastered across both the body, tracks and turret. Including all this detail to an acceptable standard would be far beyond my ability and simply the uv'ing stages could take up the entire project time table.

The American tank line came up next and i found by far the most variety within their armourments. The vast majority of the American tanks were constantly re-used and re-purposed throughout the war. Their design work included an wide variety of soft curves and sharp edges and on top of this, a lot of soldiers stored their equipment on the back and side of the tank bodies, allowing an endless amount of clutter and scrap to be added if time is available.
I found that the M4 Sherman would be the best option for the project due to its huge mass production, ensuring that no Sherman is the same and on top of this, the vehicle was flawed in so many ways that constant prototyping had to be performed to prevent engine and mechanical failures. Another up side on a modelling front is that due to these failures, a huge assortment of tools for field repairs were included on the vehicle body by default, allowing both organic and cold steel objects to be included to break up the monotony of sheet metal.


With the tank decided on, research could be done on the character, scene and gas mask. Although not all of these may be included, they could add some rather interesting geometry if added to the tank body as storage material or at the very least, provide some input on the manufacturing techniques and general quality of life within the war. The gas masks used for example looked very home made and ghastly. No time and care were put in to these, all that could be guaranteed was an airtight seal. Anything beyond this was an after thought.


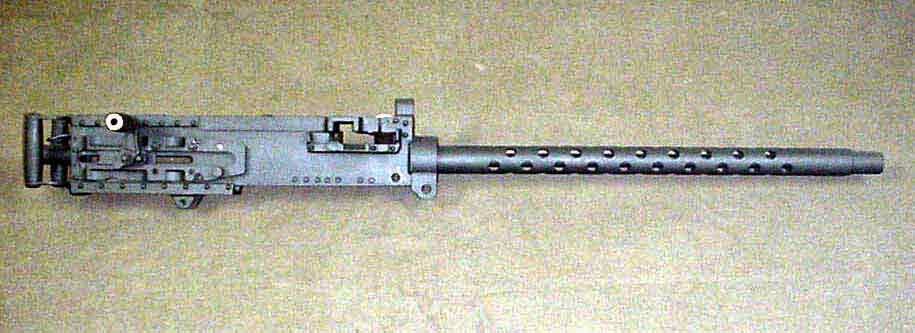
For the mounted gun, i found that either a 30 caliber or 50 caliber machine-gun was usually provided. Both of these were designed to last through the toughest of situations, often outliving the tanks themselves. To allow this, they had very robust, full steel construction with both minimal moving parts and an incredibly boxy design. From a modelling and texturing front, this would be a fairly brief yet highly effective task, adding a lot to the overall scene without too large a time commitment.


The American soldiers were not valued any where as much as in modern military. Relying mainly on power in numbers, no body armour was provided nor were complex medical supplies. All a soldier could expect would be a set of rations, basic survival gear, their rifle and a hard hat. The vast majority had far too little training to effectively use any other military gear on the battlefield nor were funds available to provide either the training or equipment. This lead to awful quality of life and a generally dreary appeal.


Looking in to the environments of world war 2, a lot of excessive scrap, make shift barriers and rushed defenses were create using any and all available materials. Battle remains were strewed across hand dug trenches and rust/ grime build up can be seen on almost every surface. These conditions would reflect directly on any asset i model for the scene as the bodywork on the M4 Sherman would be very heavily rusted on areas such as the tracks and body base. Spot welds would be heavily corroded and weather damage could very easily strip off any areas of paint, adding a lot of interesting points that could be covered within the texturing and normal maping stages.


No comments:
Post a Comment