With all the research development finalized and a project proposal prepared, the modelling for the M4 Sherman could begin, using front, side, back and top blueprints to make the entire process far more precise.


As these references came in the form of one large picture, i had to separate them within Photoshop, scale each image correctly and the import them on to simple planes within Maya before any form of modelling could start. The detail on these references is invaluable for the projects success otherwise any small, wonky detail to prevent key areas such as the tracks or turret from attaching in a realistic fashion.

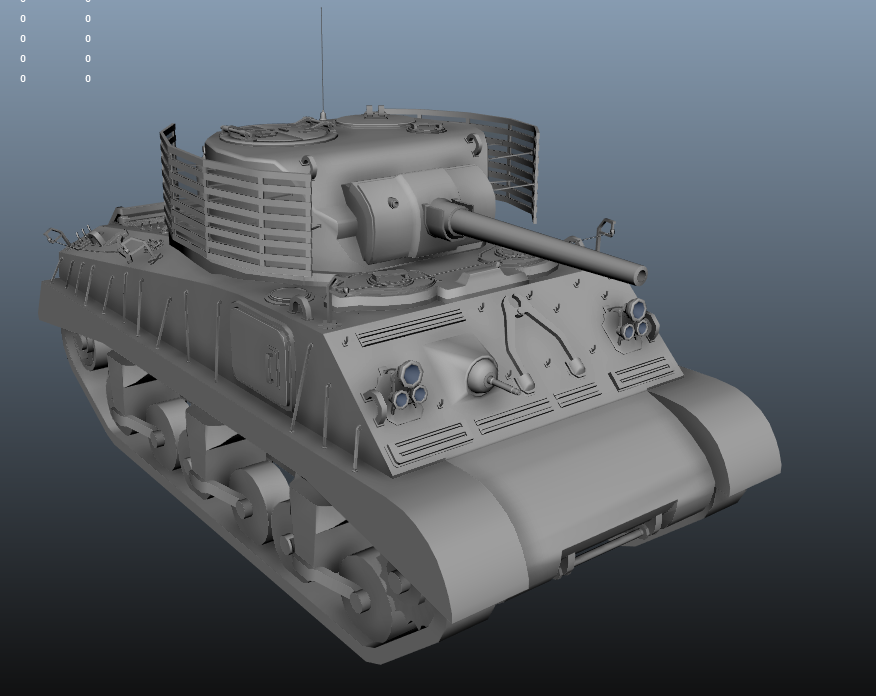
With these four images prepared, the physical modelling could take place, starting with the basic blockout. The first attempt had a fair few issues, making it near unusable due to a sever lack of knowledge and practice within 3D modelling. Due to this, i attempted to construct the main body as a single piece of geometry, making the entire task much harder on myself than it needed to be.

After watching through the vast majority of the "Hard surface modelling" tutorial by 3D motive, i realized the aposolute necessity of a blockout, to prevent myself from making such mistakes. With this in mind, i revised my strategy and attempted a second time to model the base.

This time, i kept the shapes simple, breaking the tank down in to the smallest viable pieces, ensuring the geometry was kept clean, easily understood and easy to edit. I could then build up to the full blockout.

Whilst modelling the basic blockout, i kept special care to prevent any triangles or awkward geometry to help support the high poly modelling techniques later on in the project. To do this, i ensured that each surface was constructed in a checker board pattern to allow edge loops to flow in a natural and easily understandable fashion. This does lead to a rather unoptimized end product but in turn, the entire project would run much smoother as a result.

With the basic blockout shapes, i followed the same method of constructing the geometry in a checkerboard pattern but due to the awkward geometry i decided to model each component on a flat, 2d plane before extruding out edges whenever required. Not only did this provide neat geometry, it simplified each shape in to what was technically a picture, further increasing work productivity.

These modelling techniques of course couldn't be carried on for details such as the barrel but by following the blueprints precisely, i could simply create a basic cylinder before providing a few extrusions for shaping purposes, using a 20 sided cylinder to ensure a nice final result. In heinsight this was probably a mistake though as it meant i was forced to use a much higher poly barrel that is required for the final low poly asset.

Although i should have probably created the rough shapes for most of the body detail, i decided to fully create and detail the body components one by one on the basis that there would be very little to no reason for these to be adjusted in either size or shape at any point with the base blockout/ model correctly shaped. In doing so, i added a few high poly pieces such as the bolts to each latch as it would prevent me from forgetting in the future and op of this, i could re-use them by simply dragging them to different vents across the model.

For the very top of the tank turret, i relied on a bit of creative freedom to shape the hatches in an interesting yet functional way as the blueprints for these areas were a little cloudy and difficult to follow. So i wouldn't forget the end product i had in mind for these, i created rather over-detailed variants but with the huge modularity between components so each side of the main latch as well as even the circular vent could be copied and pasted, flipped and then refitted. Details on the enteni were a fair bit over the top but hopefully this would hep provide a nice high poly bake.

With the vast majority of the turret finished, i could start experimenting with side details and found these slightly rounded metal doors located on either side of the tank. At this stage, i decided that preparing each asset to high poly standard would be the best option due to the modularity as this would prevent me from having to then delete each duplication before re-positioning them.

The designs for the side of the turret and rear of the turret were a little vague and generally quite empty so i opted for a bit more creative freedom, looking at a variety of highly detailed world war 2 tank models within "World of Tanks" to give me ideas and found that a wide variety of tanks were upgraded regularly by their crew with small details such as storage compartments for their personal use and make shift shields on either side of the turrets to increase the armour value towards any incoming projectiles a well as to prevent any solider from climbing on to the turret in an attempted seize.

A fairly awkward part of the body work that was then required consisted of the miniature stick-out turret on the front of the vehicle. Due to its organic nature positioned on the front of a body boxy tank design, i decided to model to the mini turret itself first before extruding the edges several times and bridging these edges directly to a square hole on the tank body itself. Looking then at the lights, i found that the vast majority of these tanks had simply gas lights mounted to a simple metal chassis before being welded straight to the vehicle body. As these were made up by default, i modeled a single light, duplicated it twice and constructed a frame out of simple rectangular pieces of geometry and believe in doing this, made a viably realistic lighting supply for the vehicle.

With the vast majority of base components down, i looked at storage opportunities across other M4 Sherman models and found that simple bars and singular hooks would be the most modular components, allowing me to use these across all areas of the tank to add a bit of noise and grit without making any part of the body look abnormal. Included with this was the handles. Although they may look a little out of place, they make perfect logical sense to allow members of the tank crew to climb the vehicle and retrieve tools without having to balance of a curved metal surface.

Continuing on with the theme of creativity, i added each component included on the blueprints such as the large vent, mini vents, tools, exhaust pipes and tools but then thought about what would allow the crew to survive in the worst of situations and if these components could be logically attached to the vehicle. Barb wire for one would be found anywhere across the battlefield, would be incredibly effective at stopping people from climbing on to the vehicle and could be wound round any piece of scrap material. Fire extinguishers although not included on the original blueprints were used widely by most tank crews to prevent engine fires and to combat horrifying weapons such as flame throwers. Without these readily available, the tank would barely survive past its first battle.

The tracks for one would be much easier to model high poly first before tracing these components in a low poly sleeve and due to the modularity, only four wheels and two brackets required modelling for the supports. The center support for each wheel bracket was constructed as a simple plane, traced in the shape of the brackets on the blueprints. I could then extrude the edges outwards before adding more edge loops to the center to allow the metal fold to be brought out in a realistic fashion. This wouldn't be possible with triangulated surface so keeping the construction in a checkerboard pattern of geometry is near essential.
Components such as the physical wheels were modeled as simple cylinders with basic extrusions outwards for the spiked cog and inwards for the smaller support wheels. The awkward stage came when the wheels containing holes were required. It wouldn't be very logical to model these as single components so i took a cylinder with sides that could be divided by the number of holes, deleted all but a fifth and modeled only a single sub-section. I could then center the pivot on one of these and copy them round until the full shape became present. The final steps were to then weld the edges and create the treat. The treads were fairly simple as i only had to model a single square piece, add all the required details, model the small treat connectors and then copy them round, rotating them in the side view until the full vehicle tracks were in place.

Although i should have created a low poly version of these tracks straight off the bat, as i had a fair few high poly pieces within the scene, i decided to begin adding supporting edge loops to each component so i could create very smooth and highly detailed pieces through the use of "Smooth Preview".

Starting with the barrel, i placed edges loops before and after hard edges to allow smooth preview to curve the geometry from the first point, using the second to control the curve intensity to the third point/ vertex to complete the curve. Using this method, you can give almost any piece of geometry a very nice, smooth mesh with minimal effort. Remember to create a full duplication of the tank before this stage though or it could take upwards of 10 hours to remove and clean up the supporting geometry to return you right back to the low poly for baking purposes. I found this out the hard way. If the geometry is highly triangulated, adding support geometry can become impossible if not just incredibly tedious a task.

Due to the modularity of the assets and the quad construction, adding the supporting geometry before smoothing should work flawlessly on most components but for more complex objects where you may require a curve on one end and a sharp edge on the other, you may have to manually merge the vertexes through trial and error until you are left with a entirely smooth and error-less asset.

With each component fully provided with supporting geometry, the model can be converted from smooth mesh to polygon using the "Convert> Smooth mesh to Polygon" tool within the edit menu but due to the complexity of the mesh, doing this all at once for my tank instantly crashes Maya due to the severe poly count, hitting upwards of 12 million tris. Maya begins to struggle at one million so this is a rather large issue so logically, each component would need to be exported separately.
Before the baking process could begin, i had to re-visit the low poly and optimize it as much as possible as the checkerboard modelling method left a lot of un-needed geometry. As most of this was contained on modular props, there wasn't all too much to be done besides tracing the high poly tracks with lower poly components but areas such as the tank body requires some extra geometry to bring its shape and quality in to line with the rest of the vehicle. I wish i could have found a quicker way to optimize the model but i was forced to merge vertex by vertex until the entire model was brought down to 36,000 tris which is well inside the World of Tanks budget.
No comments:
Post a Comment