Sunday, 14 December 2014

Specialist 3D - Tank Uv'ing, Baking and Texturing

The Uv'ing Process

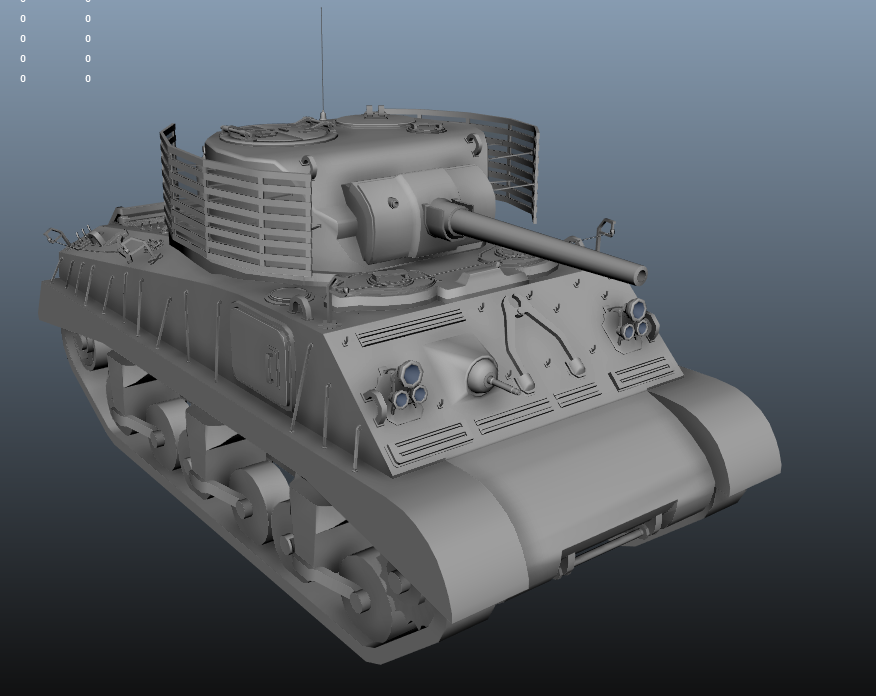
When it came to the uv'ing section of the project, i greatly underestimated the amount of props contained in the 36,000 triangle model and their general complexity. This meant that my uv'ing timetable set out within the gant chart was thrown entirely out. I imagined that the entire Uv'ing process could be finished within no more than three days but ended up spending at least a week straight simply projecting and attaching each face.


Every single modular component was planar mapped separately; projecting each viewable face at any given time e.g. projecting the front and back faces at the same time. Once these projections were done, the backwards faces could be flipped and the projection scaling within the channel editor could be set tothe same value throughout. This ensured that every component of the tank was uv'ed to perfect scale. For the most part i had to attach each face and sew every edge manually but the "Smooth Uv" tool came to the rescue in certain circumstances, entirely unfolding both simple and complex geometry with very little to no extra effort.

I found it to be much easier to simply project and construct each of these components before even considering organizing them within the uv square as i had very little to no idea just how many projections and components i would be left with. After projecting these surfaces and constructing the basic uvs, i could experiment with shaping, moving components with simple box shapes to provide me with a decent idea on the final uv outcome.


With all the uv's fully set out, i could check closely for stretching on any crucial component, ensuring that stretching was only present in areas that could be hidden quite easily through the use of weld marks within the texturing process. This stage felt quite rewarding as i could finally organize the uv sheet in preparation for the baking process. I attempted to place all texture seems across major welding marks in an attempt to make them reasonably easy to hide.


    The actual organization of the Uv's ended up being a fairly fast and effective process. Due to all the projection scaling, all i had to do was place the major components in a tetris style before adding the smaller components at as large a scale as possible. After each successful organization, i enlarged each of the key components before attempting to compress the uv sheet more and more. Eventually i was left with almost no wasted uv space and could begin the baking process.

Baking

Going in to the baking process, i expecting a very quick and effective process, baking out entire components before combining both the normals and ambient occlusion maps within Photoshop. I couldn't have been anymore wrong. Due to the complexity of the geometry within my scene, i was forced to export every tiny piece of geometry, one by one until there was no possibility of baking issues occurring and alongside this, i couldn't export any component as an obj as this became an unrecognized format within Xnormals which i decided to use for the baking process after Maya began "Fatal Error"ing each time i attempted an ambient occlusion bake.


I had to set the FBX export settings to "smooth mesh" and "triangulate" to even allow the objects to bake within the first place. On top of this, to export each object, i had to convert each piece of the high poly tank to "smooth mesh to polygon" separately before overlaying them perfectly with the low poly counterpart, making for a very messy and stressful process, especially with the hundreds of individual FBX exports that each needed baking. Without a fully fledged out file structure, this task would have been impossible.


When loading each low and high poly component in to Xnormals, i had to set the scaling to 100 times as i forgot to change the Maya grid scale before beginning the project, meaning that my tank by default was only the size of bread crumb. Although it is not essential, i decided to run the ray distance calculator on each low poly component to provide the best possible bake but this did increase the baking time and effort substantially. On top of this, i was forced to run a test bake on each component to look for issues before running the full 4k bake as these took upwards of a half hour each to complete, especially with the 4x anti aliasing.


After exporting each of these components, a lot of caffeine and almost overheating my computer in the process, i put the files in to a simple file structure with a folder for each key tank area and could then begin combining them within Photoshop.


The only way i could accurately combine each of these maps within Photoshop was to import each set of normals and ambient occlusion maps before tracing each component area wit the polygonal lasso tool. As i wished for this entire baking stage to be over and done with it, i completed the baking and map combining after a 20 hour straight work session although this did give me a fair bit of breathing room when it came down to deadlines.


Texturing
              
Texturing was the very final step to the tank asset's creation and became by far the most relaxing step as i could see the finalized product slowly coming together with each completed component. Going in to the texturing stage, i usually abandon all methodology and combine hundreds of base textures in different style,s turning the entire project in to a learning experience but due to the scale of a fully fledged 4k texture sheet, i was forced to develop a feasible and effective pipeline to carry me from start to finish.

With a little more research in to already existing pipelines such as the one used by "World of Tanks" and with a fair bit of trial and error, i found that i could create a nice, rusted/ damaged and spot welded surface using four layers on each component;

The first layer should contain only the base material/ the actual material you would expect to see on the materials surface before any wear and tear. For the most part, this was either metal tubing for pipes, heavily scratched metal blocks for tool heads or even corroded metal for areas such as the track pieces that need to reflect a horrifying amount of damage.

The second layer should contain the highlights such as paint splatters, surface damage, mould or even very slight rusting. This when set to an overlay should provide a nice result although as i found, due to the brightness of my ambient occlusion map, i had to tweak a lot of the hue/ saturation and lightness/ darkness values across both layers until a nice end product was created.

The third layer should contain extreme rust/ damage information, be placed over the first and second layers but using the eraser tool, the rust/ damage should be entirely removed from anything beyond sharp corners to provide a realistic rusting effect. Setting this layer to 70 percent opacity and altering its style to "soft light"provides the perfect rusting effect although the saturation and light/ darkness values need to be heavily tweaked depending on the base materials to prevent the rust from becoming overpowering.

The fourth and final layer will be the physical weld/ damage highlights. This is incredibly simple as all it consists of is an "inner bevel" layer style. Trace any hard edges, lower the fill to 40 percent and opacity to at least 60 percent and it'll really bring out each component. For more of a cartoon look, just adjust the opacity and fill values until you find a fitting result.

Using this four step system and a fully structured filing system, i managed to remove most if not all the stress and confusion from the texturing process.

     
 As you can see the system in action, i started with the largest components, tested a wide variety of base materials and then renamed them according to their most fitting use. To then prevent myself from losing these, i created copies and placed this within a "Base Texture" folder at the very top of my layers to make them easily accessible.


I played around a lot with different base textures for components such as the hatches and barrel components and found that a combination of paint chippings and a polished base metal could really make these features stick out with very minimal change to the work flow. After creating each of these components, i payed special care to the folder structures for each component so i could re-visit these in the future for either reference or to change texture/ lighting values.

    
By this stage, i had managed to create the vast majority of the materials excluding the track pieces using just a combination of eight textures, all with different lighting and saturation values, overlayed in the four step program as before but as components such a the tracks would be far rustier than anything else on the tank, i had to find a few new base materials to really make the corrosion stick out.


For the track and wheels, i found that the best combination came from a mixture of shiny base metals combined with metals corroded heavily by salt water to add a fair bit of noise and to really add some scratching to components such as the spiked cog, i could re-use the scratched tool metal to simulate heavy use. The only issues here is that due to the noise and darkness of the rust, it bleached out a huge amount of the track normals, ruining one of the best bakes of the entire model.


I found that applying two sharpen filters to almost every layer within the Photoshop file made up greatly for the lack of texture resolution on some components. This also made it near impossible to see even a single texture seem, making the entire model practically seamless. The final stage was the create a copy of the Photoshop file, flatten it and then to apply the Xnormals "Heigh to normal" option to turn all the noise in to a physical normal map. I could then overlay this with the original normal map and apply it to the final model.

All in all with all these maps applied to the model, im extremely pleased with the end result. I know it looks very bleak and probably requires a lot more colour but its probably the best end product i could have hoped to achieve with the time constraints.

I will need to tone down the Xnormals "height to normals" map before its portfolio ready and as i couldn't actually model the rest of the assets for the project i cant call the overall project a success. I have learnt a huge set of high and low poly modelling skills, increased my uving speed greatly, been given a greater understanding of baking techniques and developed an effective texturing work flow but these were only supposed to be side results. Without showcasing emotion or even dipping in to PBR texturing, the original project was derailed from the start.         

Specialist 3D - Tank Construction

Building the Tank

With all the research development finalized and a project proposal prepared, the modelling for the M4 Sherman could begin, using front, side, back and top blueprints to make the entire process far more precise.


As these references came in the form of one large picture, i had to separate them within Photoshop, scale each image correctly and the import them on to simple planes within Maya before any form of modelling could start. The detail on these references is invaluable for the projects success otherwise any small, wonky detail to prevent key areas such as the tracks or turret from attaching in a realistic fashion.


With these four images prepared, the physical modelling could take place, starting with the basic blockout. The first attempt had a fair few issues, making it near unusable due to a sever lack of knowledge and practice within 3D modelling. Due to this, i attempted to construct the main body as a single piece of geometry, making the entire task much harder on myself than it needed to be.


After watching through the vast majority of the "Hard surface modelling" tutorial by 3D motive, i realized the aposolute necessity of a blockout, to prevent myself from making such mistakes. With this in mind, i revised my strategy and attempted a second time to model the base.


This time, i kept the shapes simple, breaking the tank down in to the smallest viable pieces, ensuring the geometry was kept clean, easily understood and easy to edit. I could then build up to the full blockout.


Whilst modelling the basic blockout, i kept special care to prevent any triangles or awkward geometry to help support the high poly modelling techniques later on in the project. To do this, i ensured that each surface was constructed in a checker board pattern to allow edge loops to flow in a natural and easily understandable fashion. This does lead to a rather unoptimized end product but in turn, the entire project would run much smoother as a result.


With the basic blockout shapes, i followed the same method of constructing the geometry in a checkerboard pattern but due to the awkward geometry i decided to model each component on a flat, 2d plane before extruding out edges whenever required. Not only did this provide neat geometry, it simplified each shape in to what was technically a picture, further increasing work productivity.


These modelling techniques of course couldn't be carried on for details such as the barrel but by following the blueprints precisely, i could simply create a basic cylinder before providing a few extrusions for shaping purposes, using a 20 sided cylinder to ensure a nice final result. In heinsight this was probably a mistake though as it meant i was forced to use a much higher poly barrel that is required for the final low poly asset.


Although i should have probably created the rough shapes for most of the body detail, i decided to fully create and detail the body components one by one on the basis that there would be very little to no reason for these to be adjusted in either size or shape at any point with the base blockout/ model correctly shaped.  In doing so, i added a few high poly pieces such as the bolts to each latch as it would prevent me from forgetting in the future and op of this, i could re-use them by simply dragging them to different vents across the model.


For the very top of the tank turret, i relied on a bit of creative freedom to shape the hatches in an interesting yet functional way as the blueprints for these areas were a little cloudy and difficult to follow. So i wouldn't forget the end product i had in mind for these, i created rather over-detailed variants but with the huge modularity between components so each side of the main latch as well as even the circular vent could be copied and pasted, flipped and then refitted. Details on the enteni were a fair bit over the top but hopefully this would hep provide a nice high poly bake.


With the vast majority of the turret finished, i could start experimenting with side details and found these slightly rounded metal doors located on either side of the tank. At this stage, i decided that preparing each asset to high poly standard would be the best option due to the modularity as this would prevent me from having to then delete each duplication before re-positioning them.


The designs for the side of the turret and rear of the turret were a little vague and generally quite empty so i opted for a bit more creative freedom, looking at a variety of highly detailed world war 2 tank models within "World of Tanks" to give me ideas and found that a wide variety of tanks were upgraded regularly by their crew with small details such as storage compartments for their personal use and make shift shields on either side of the turrets to increase the armour value towards any incoming projectiles a well as to prevent any solider from climbing on to the turret in an attempted seize.


A fairly awkward part of the body work that was then required consisted of the miniature stick-out turret on the front of the vehicle. Due to its organic nature positioned on the front of a body boxy tank design, i decided to model to the mini turret itself first before extruding the edges several times and bridging these edges directly to a square hole on the tank body itself. Looking then at the lights, i found that the vast majority of these tanks had simply gas lights mounted to a simple metal chassis before being welded straight to the vehicle body. As these were made up by default, i modeled a single light, duplicated it twice and constructed a frame out of simple rectangular pieces of geometry and believe in doing this, made a viably realistic lighting supply for the vehicle.


With the vast majority of base components down, i looked at storage opportunities across other M4 Sherman models and found that simple bars and singular hooks would be the most modular components, allowing me to use these across all areas of the tank to add a bit of noise and grit without making any part of the body look abnormal. Included with this was the handles. Although they may look a little out of place, they make perfect logical sense to allow members of the tank crew to climb the vehicle and retrieve tools without having to balance of a curved metal surface.


Continuing on with the theme of creativity, i added each component included on the blueprints such as the large vent, mini vents, tools, exhaust pipes and tools but then thought about what would allow the crew to survive in the worst of situations and if these components could be logically attached to the vehicle. Barb wire for one would be found anywhere across the battlefield, would be incredibly effective at stopping people from climbing on to the vehicle  and could be wound round any piece of scrap material. Fire extinguishers although not included on the original blueprints were used widely by most tank crews to prevent engine fires and to combat horrifying weapons such as flame throwers. Without these readily available, the tank would barely survive past its first battle.


The tracks for one would be much easier to model high poly first before tracing these components in a low poly sleeve and due to the modularity, only four wheels and two brackets required modelling for the supports. The center support for each wheel bracket was constructed as a simple plane, traced in the shape of the brackets on the blueprints. I could then extrude the edges outwards before adding more edge loops to the center to allow the metal fold to be brought out in a realistic fashion. This wouldn't be possible with triangulated surface so keeping the construction in a checkerboard pattern of geometry is near essential.

Components such as the physical wheels were modeled as simple cylinders with basic extrusions outwards for the spiked cog and inwards for the smaller support wheels. The awkward stage came when the wheels containing holes were required. It wouldn't be very logical to model these as single components so i took a cylinder with sides that could be divided by the number of holes, deleted all but a fifth and modeled only a single sub-section. I could then center the pivot on one of these and copy them round until the full shape became present. The final steps were to then weld the edges and create the treat. The treads were fairly simple as i only had to model a single square piece, add all the required details, model the small treat connectors and then copy them round, rotating them in the side view until the full vehicle tracks were in place.


Although i should have created a low poly version of these tracks straight off the bat, as i had a fair few high poly pieces within the scene, i decided to begin adding supporting edge loops to each component so i could create very smooth and highly detailed pieces through the use of "Smooth Preview".


Starting with the  barrel, i placed edges loops before and after hard edges to allow smooth preview to curve the geometry from the first point, using the second to control the curve intensity to the third point/ vertex to complete the curve. Using this method, you can give almost any piece of geometry a very nice, smooth mesh with minimal effort. Remember to create a full duplication of the tank before this stage though or it could take upwards of 10 hours to remove and clean up the supporting geometry to return you right back to the low poly for baking purposes. I found this out the hard way. If the geometry is highly triangulated, adding support geometry can become impossible if not just incredibly tedious a task.


Due to the modularity of the assets and the quad construction, adding the supporting geometry before smoothing should work flawlessly on most components but for more complex objects where you may require a curve on one end and a sharp edge on the other, you may have to manually merge the vertexes through trial and error until you are left with a entirely smooth and error-less asset.


With each component fully provided with supporting geometry, the model can be converted from smooth mesh to polygon using the "Convert> Smooth mesh to Polygon" tool within the edit menu but due to the complexity of the mesh, doing this all at once for my tank instantly crashes Maya due to the severe poly count, hitting upwards of 12 million tris. Maya begins to struggle at one million so this is a rather large issue so logically, each component would need to be exported separately.


 Before the baking process could begin, i had to re-visit the low poly and optimize it as much as possible as the checkerboard modelling method left a lot of un-needed geometry. As most of this was contained on modular props, there wasn't all too much to be done besides tracing the high poly tracks with lower poly components but areas such as the tank body requires some extra geometry to bring its shape and quality in to line with the rest of the vehicle. I wish i could have found a quicker way to optimize the model but i was forced to merge vertex by vertex until the entire model was brought down to 36,000 tris which is well inside the World of Tanks budget.     


Friday, 12 December 2014

Specialist 3D - Tank Development - Research

Specialist 3D

The concept of Specialist 3D was to pick a design and development project to develop over the space of 12 weeks to build important, fundamental skills, formulate ideas, test out concepts and overall to aim to create an end product to justify at least 60 hours of work. As the project grade is based 70% on a final report and only 30% on the physical project itself, it should greatly improve any and all report writing skills. On top of this, the project did not have to be a success. A failure is still viable if explain and justified.

For this project, i wanted to use my time to develop high/ low poly modelling techniques, increase my uv'ing speed and to create an effective texturing pipeline to remove the clutter and slowdown within any large scale texture map. 

Project Proposal and Initial Ideas


For my independent project, i will be looking at a wide variety of modelling and texturing techniques. Covering everything from high polly vehicle modelling, character modelling, creating a believable, natural looking environment and the use of lighting and colour within Unreal 4 to bring both emotion and a sense motion to a static, wartime scene.
This scene will take the form of a world war 2 trench, focusing mainly on a beaten down, disabled tank. In-front of the vehicle; a fierce looking canister spewing mustard gas will be displayed menacingly. With the toxic mist engulfing the base of the tank and pouring inwards, towards to an open trench; the head of a tearful man will be visible, pressing a battered gas mask against his face.
With the main body and turret of the tank visibly damaged and inoperable, the upper torso and panicked, yet highly focused face of a second mask less solider will be seen from within the tank's turret, grasping on to a functional mounted machine-gun, covering the retreat of his comrades. With the hopeful addition of a wisp of smoke from the weapon's barrel and a scattered pile of shell casings, it should simulate continuous fire. The final touch taking the form of emergency flares, lay across the ground, illuminating the scene with a violent red.   
  
I will be doing this scene to provide myself with a variety of challenges within each key aspect of level design and to create a portfolio piece that can be used to show a wide variety of skills as well as functioning is a point of reference when improving future work/ projects. Although it may not be a new concept, it will provide me with priceless knowledge that can be applied to second term and third year study, motivating me greatly. I will be making a point to showcase the damage and destruction through the texture work, adding extra grit in regards to the emotion dictated within each area.
The success of the project will be based on the quality of the end products when combined within the scene. Although i could call it a partial success if a large enough increase of skill within each area has been reached, i would at least like each aspect to be on par in terms of quality. With the time restraints, it should be more than possible although fancy lighting and mist/ smoke effects within the game engine "Unreal 4" may have to be left behind if they become too awkward or time consuming. Even in this case, i would like to still showcase the scene as a whole and the assets, layed out one-by-one to a selection of first, second and third year students and ask for their opinions on each aspect from modelling, texture work and style. Ending on a simple question of "if they were in industry, would they allow the assets through quality assurance".
I would like the test the emotional reaction that can be achieved by showcasing the horrors of war and bravery/ selfless nature found within those serving on the front line. Although there are no ethical issues with the project, it may be seen as quite distasteful by anyone of German origin due to the heavily implied Nazi threat.
With the increasing popularity of software packages such as NDU which greatly increases the speed of texturing, generating a variety of fully functional maps on its own, i feel that combining hard surface texturing techniques alongside hand painted methods will be essential so i am not left too reliant on its automated methods in the future and can understand the effects of wear and tear on a wide variety of materials and surfaces.
Knowledge wise, i have a decent understanding of texturing, both high and low polly modelling and the techniques used within but i have a variety of tutorials available that will be watched over the 12 weeks to further increase my knowledge and enthusiasm. I'm anticipating the tank to be fairly time consuming yet not too difficult but the partial character modelling could take anywhere from a few nights to upwards of a week to get up to par.
I have collected a wide assortment of reference photos and blueprints for American tanks, trenches and wartime scenes  that i should be able to use as a basis for the modelling and texturing. I have attempted to find 3d artists that have depicted both fear and bravery within a hopeless, wartime environment but have been unable to find anything substantial. To ensure that my time is used effectively, i will be modelling the high polly version of the tank whilst looking further for artist reference. As the tank will be built directly from blueprints, there's very little to no chance of the model requiring any changes after solid research has been completed. 
--------------------------
Before moving forwards with the modelling process, a lot of extra research took place, mainly in to the look and feel of military vehicles and attire within world war 2 on the soviet, German, British and American fronts to see what side offered the most creative freedom within their designs.
Starting with the German military, i found that they opted for very body and bare-bone designs for almost all of their vehicles and very rarely included outside details. On top of this, due to their very grey colour scheme, very little to no detail could be found on their vehicles. Take the Tiger tank for example as shown below. The entire tank consists of a simple box for the main body and a second box for the turret. A fair bit of detail can be seen in the barrel and tracks but these would not really be seen as focus points, making it a fairly un-interesting task to model with very few options for skill building atleast within the modelling stages.

Soviet tanks were the next on the research list and for the most part seemed very rounded in nature, adding some interesting geometry but as with the German tank line, very few extra details are seen across the turret and main body leading me to believe that they went for a very minimalistic design path. Although the rounded shapes and angled armour would help develop my modelling skills, the sever lack of clutter would make the project too small and uninteresting. Take the Is-2 heavy tank for example.

   
British tanks were the next line to cover but had the entire opposite problem to the soviet and German designs in the fact that they contained far too much detail which would make the entire project far too overwhelming. I understand that the project doesn't need to succeed but i do want to leave specialist 3D with at least one portfolio ready piece. The Churchill tank for example contained hugely detailed, curved and straight pieces of armour plastered across both the body, tracks and turret. Including all this detail to an acceptable standard would be far beyond my ability and simply the uv'ing stages could take up the entire project time table.


The American tank line came up next and i found by far the most variety within their armourments. The vast majority of the American tanks were constantly re-used and re-purposed throughout the war. Their design work included an wide variety of soft curves and sharp edges and on top of this, a lot of soldiers stored their equipment on the back and side of the tank bodies, allowing an endless amount of clutter and scrap to be added if time is available.

I found that the M4 Sherman would be the best option for the project due to its huge mass production, ensuring that no Sherman is the same and on top of this, the vehicle was flawed in so many ways that constant prototyping had to be performed to prevent engine and mechanical failures. Another up side on a modelling front is that due to these failures, a huge assortment of tools for field repairs were included on the vehicle body by default, allowing both organic and cold steel objects to be included to break up the monotony of sheet metal.


With the tank decided on, research could be done on the character, scene and gas mask. Although not all of these may be included, they could add some rather interesting geometry if added to the tank body as storage material or at the very least, provide some input on the manufacturing techniques and general quality of life within the war. The gas masks used for example looked very home made and ghastly. No time and care were put in to these, all that could be guaranteed was an airtight seal. Anything beyond this was an after thought.


For the mounted gun, i found that either a 30 caliber or 50 caliber machine-gun was usually provided. Both of these were designed to last through the toughest of situations, often outliving the tanks themselves. To allow this, they had very robust, full steel construction with both minimal moving parts and an incredibly boxy design. From a modelling and texturing front, this would be a fairly brief yet highly effective task, adding a lot to the overall scene without too large a time commitment.


The American soldiers were not valued any where as much as in modern military. Relying mainly on power in numbers, no body armour was provided nor were complex medical supplies. All a soldier could expect would be a set of rations, basic survival gear, their rifle and a hard hat. The vast majority had far too little training to effectively use any other military gear on the battlefield nor were funds available to provide either the training or equipment. This lead to awful quality of life and a generally dreary appeal.


Looking in to the environments of world war 2, a lot of excessive scrap, make shift barriers and rushed defenses were create using any and all available materials. Battle remains were strewed across hand dug trenches and rust/ grime build up can be seen on almost every surface. These conditions would reflect directly on any asset i model for the scene as the bodywork on the M4 Sherman would be very heavily rusted on areas such as the tracks and body base. Spot welds would be heavily corroded and weather damage could very easily strip off any areas of paint, adding a lot of interesting points that could be covered within the texturing and normal maping stages.